Part II
(Crochet * Stash-buster)
.jpg)
[Note: I will be sharing the stitches in the order I made them, but they can be mixed and matched any way you prefer. All stitch patterns are designed to match the “multiple of 3+2” rhythm. At the end, I will share some other stitches that I did not use personally, but can be added to the Fantasy Blanket].
[Nota: Estaré compartiendo las puntadas en el orden que yo las hice, pero pueden combinarse y mezclarse como prefieran. Todos las secuencias están diseñadas para al ritmo de “múltiplo de 3+2”. Al final, les compartiré algunas puntadas extras que no usé en la mía, pero pueden ser añadidas a la Manta Fantasía).
The next part of the Fantasy Blanket is a row of cute flowers…
La siguiente sección de la Manta Fantasía es una hilera de lindas flores…

A while ago, I found the pattern of this cute row of flowers in Pinterest, and I knew I had to use them in a blanket. In the original source, this stitch is used as part of a headband (Crochet Flower Bud Headband@ Dearest Debi), but it can easily be adapted to blankets and other things. [Note: a dear reader pointed out that there is a similar pattern for an afghan in the Red Heart site: "Flowers in a Row". There are some tiny differences with the pattern below, but very similar. Thanks, Katie, for the info!]
Hace un tiempo encontré esta puntada de flores en Pinterest, y la guardé con el in de usarla para una manta. En la fuente original, esta puntada es parte del patrón de una diadema (CrochetFlower Bud Headband @ Dearest Debi), pero puede ser fácilmente adaptado para mantas y otras cosas. Hay otra manta similar en el sitio Red Heart: "Flowers in a Row".
I decided to re-draw the chart in order to indicate with arrows the direction in which the rows need to be worked…
Decidí dibujar la puntada para poder indicar con fleches la dirección en que cada hilera debe tejerse.

Work on the Right Side (RS) rows 1, 3, 4, 5
Work on the Wrong Side (WS) rows 2, 6
En la parte delantera, las hileras 1, 3, 4, 5
En la parte de atrás, las hileras 2, 6
Take note of the following tips:
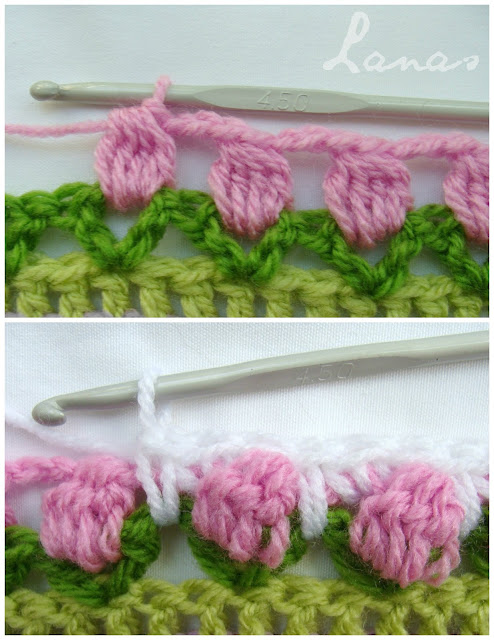
* The petals start and end on the 1-ch space (of the stems).
* The background (“sky”) starts on which seems the 4th row, but actually are part of the 5throw. It is a row of all sc’s. Take note of the arrows, which indicate where you need to make them. *The third sc is made on top of the petals, the fourth in the 3-chain space, and the fifth joins the 3-ch space and the space between the stems* (repeat between * and *). This is the row that will make the flower pop out.
* If you feel the flower cluster is too bulky, make it with 4dc tog (instead of 5).
Tomen nota de lo siguiente:
* Los pétalos comienzan y terminan en el espacio de 1 cadena (de los tallos).
* El cielo o fondo comienza en lo que parece la 4ta hilera, pero en realidad es parte de la 5ta hilera. Es una hilera de solo puntos bajos. Pongan atención a las flechas del diagrama, donde se indica donde deben colocar los puntos.
* Si sienten que la flor está muy abultada, háganla con 4 puntos altos (en lugar de 5).

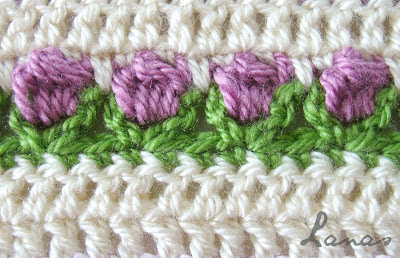
Colors:
For my blanket, I used the “obvious colors”: light green for the grass, dark green for the stems, pink for the petals, and white for the background. But you can actually change the colors anyway you want. For example, someone made the background and the “grass” all in cream. To compensate for the lack of grass, she made an extra row of sc’s in green…
Colores:
Para mi manta, usé los “colores obvios”, es decir: verde claro para la grama, verde oscuro para los tallos, Rosado para los pétalos, y blanco para el fondo. Pero pueden hacer cualquier combinación de colores que prefieran. Por ejemplo, alguien hizo “la grama” en crema, y para compensar la falta de grama, tejió una hilera extra de puntos bajos en verde…